Steps:
A) Login in Finacle.
B) Select ‘Solution’ as ‘CRM’.
C) Click on ‘CIF Corporate’
Folder > ‘New Entity’ > ‘Customer’.
D) Please fill all the Mandatory Fields
highlighted using * symbol.
Tab – GENERAL Sub tab –
BASIC INFO
Note: Please do not input anything
in CIF ID field even though it’s marked as mandatory. The system will create
its own CIF ID at end of the process.
1)
‘Relationship Start Date’ has to be current date (default system date i.e.
10/11/2011).
2)
‘Assigned Priority’ - Please select any value assigned in the dropdown
list.
3)
‘Legal Entity Type’ - Please select any value assigned
in the dropdown list but suggested values will be
PUBLIC LIMITED COMPANY or
PRIVATE LIMITED COMPANY for ease of operations later.
4)
‘Key Contact Person’s Name’ – Students can input their
own name.
5) ‘Corporate Segment’ – Please select CORPORATE using
searcher option.Only one value has been assigned –
CORPORATE.
6)
‘Sub-segment’ - Only one value has been assigned in
dropdown list – CORPORATE.
7)
‘Phone No.’ - Students can input their own contact no.
8)
‘Business Type’ - Please select any value assigned in
the dropdown list.
9)
‘Principal Place of Operation’ – Please select INDIA using searcher
option.
10)
‘Remarks’ – Students can input their personal remarks
like SMALL CORPORATE, MEDIUM
CORPORATE
OR LARGE CORPORATE.
11)
‘Registration No.’ – Please input eight digit
alphanumeric numbers.
12)
‘Incorporation Date’ – This date has to be prior to 10th December
2011. The reason for this compulsion is the fincore date is of 10th December
2011 and system will not create an account later if the ‘Incorporation date’ is
later then the Fincore system date.
13)
‘Region’- Please select any value using searcher option.
14)
‘Primary SOL ID’ – Its ‘001 – CENTRAL OFFICE’ by
default.
15)
‘Relationship Type’ – Please select CUSTOMER from the
dropdown list.
16)
‘Sector’ - Please select any value assigned in the dropdown list.
17)
‘Sub-sector’ - Please select any value using searcher option.
18)
‘Tax ID’ - Please input eight digit alphanumeric numbers.
19)
‘DSA ID’ - Please select the value using searcher option.
20)
‘Entity Class’ – Default value in dropdown list is
NONE.
21)
‘Fund Source’’ – Student can input any source of fund in this field.
22)
‘Base CCY’ - Please select INR using searcher option.
23)
‘Average Annual Income’ – Mention income as ‘99,99,99,99,999.00’
24) ‘Native
Language Code’ – English.
25) ‘Availed Trade Services’ – Please select Y.
26)
‘Primary Relationship Manager’ - Please select any value using searcher
option.
27)
‘Enable E-Banking’ – This has to be N by default.
Sub Tab –
IDENTIFICATION DOCUMENT
1)
Click on ‘Add Identification Document Details’.
2)
‘Document Type’ - Please select CORP PAN CARD to be the default value.
3)
‘Document Code’ – Please select PAN CARD.
4)
‘Unique ID’ – Students can input their own PAN Card no
if they have it or else input ABCDE1234F.
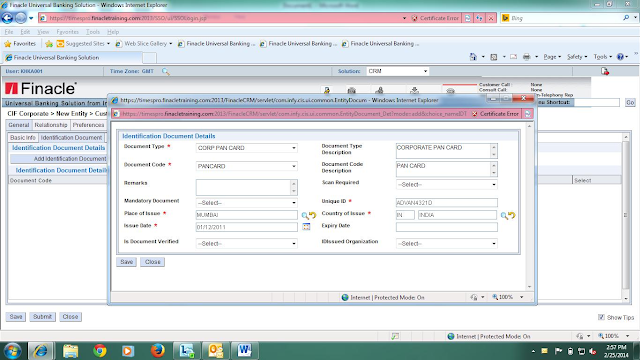
5)
‘Place of Issue’ – Students can input their center location.
6)
‘Country of Issue’ - Please select INDIA using searcher option.
7)
‘Issue Date’ - This date has to be equivalent to ‘Incorporation
Date’ (or FINCORE date i.e. 10/12/2011).
8) Click on SAVE button once all inputs
have been done.
Sub Tab – CONTACT – ADDRESS
1)
‘Preferred Address Type’ – Default value is ‘REGISTERED’. Please do not
change it.
2)
‘Address Format’ – Default value is STRUCTURED.
3)
‘Address Type’ - Default value is ‘REGISTERED’. Please do not change
it.
4)
Please input the data next to all mandatory fields and
use the searcher option wherever required.
5)
‘Address Valid From’ - This date has to be equivalent
to ‘Incorporation Date’ (or FINCORE date i.e. 10/12/2011)
6)
‘Hot Mail Indicator’ – Default vale will be N.
7) Click on SAVE button once
all inputs have been done.
Sub Tab – CONTACT –
PHONE AND E-MAIL
1)
‘Preferred Contact No. Type’ - Please select any value
from the dropdown list. Suggested value will be CELLPHONE.
2)
‘Preferred Email-ID Type’ - Please select any value
from the dropdown list. Suggested value will be COMMUNICATION.
3) Click on ‘Add Phone and E-mail’.
4)
‘Phone No. / E-Mail’ – Select PHONE.
5)
‘Type’ – Select CELLPHONE (as suggested in point 1)
6)
‘Phone No.’ – Students to input their own phone no.
7)
Click on SAVE button once all inputs have been done.
8) Again click on ‘Add Phone and E-mail’.
9)
‘Phone No. / E-Mail’ – Select E-MAIL.
10)
‘Type’ – Select COMMUNICATION (as suggested above in
point 2).
11)
‘Email-ID’ – Students can put their own email ID.
12) Click on SAVE button once all inputs have been
done.
Sub Tab – CURRENCY.
1)
Click on ‘Add CCY’.
2)
Please keep all other values as it is. Input the ‘Preferential Expiry
date’ as 31/12/2099 only.
3)
Click on SAVE button once all inputs have been done.
Other Sub Tabs are non-mandatory under tab
GENERAL.
Tab – RELATIONSHIP
1) ‘Relationship Type’ – Default value is BENEFICIARY. Please let this value be as it is. Do not select anything else or add or modify any field.
Tab – TRADE FINANCE
1)
‘Inland Trade Allowed’ – Select Y.
2)
‘Customer Native’ – Select Y.
All other tabs are
non-mandatory. But these tabs may become mandatory depending upon the different
types of accounts created.
Now click on SUBMIT button. You will get a message
as mentioned below.
Click on OK button. A confirmation message with New
CIF ID created will appear.
Please note down the CIF ID.
Click on OK button.
A Process Selection window will open
in which we have to select the Process name similar to suggested Process name
(If system allows) and / or click on ‘Save Process Selection’ button.
The CIF ID thus generated will be
saved in the database of CRM which needs to be verified for the CIF ID to be
available for transfer from CRM to FINCORE.
Verifier / Checker will login in CRM
and Select ‘Entity Queue’ under CIF Corporate.
A new window will open with Tray type as ‘Self’ and
Action as ‘Submitted for Approval’.
1)
In Tray Type – Select ‘Business Centre Group’.
2)
In Group type – Select ‘General Banking’.
3)
In BC – Select ‘Central Office’.
Now click on ‘Submit’ button.
The System will display all the CIF ID available for
verification in this tray.
Click on the ‘Select Box’ of the CIF
ID that has to be verified.
Once the whole CIF entry is
highlighted by the system. Do ‘right-click’ on the entry (except hyperlinks)
then click on Entity > Get As Assignee.
The system will give a confirmation
message ‘Entity has been successfully moved in the Self Tray’
Click on ‘OK’ button. The entry will
be available in your Self tray.
Again Click on Select Box of the CIF
ID to be verified. The entry will be highlighted.
Then click on the CIF ID and check
the data entered by the maker. Please check the data on all tabs which are
mandatory.
After the data has been checked then
click ‘Close’ button.
Now click on
the tab ‘Current Process Step’
A hyperlink will appear ‘Approval :-
Process Time : 1 Days’. Click on this and an another window will open.
On this window select Decision as ‘Approve’
from the drop down list.
Then Click on ‘Save Approval Form’ button.
A message will appear ‘Approval Form
was saved successfully’.
The CIF ID has been verified successfully.


